连接与分页
在本节中,我们将了解如何处理大量项目的集合,包括分页列表和无限滚动。在 Relay 中,分页和无限滚动的列表使用称为连接的抽象进行处理。
Relay 在处理分页项目集合时会为你完成很多工作。但为了做到这一点,它依赖于在你的 schema 中对这些集合进行建模的特定约定。这种约定功能强大且灵活,来自于在使用项目集合构建许多产品时的经验。让我们逐步了解这种 schema 约定的设计过程,以便我们能够理解它为什么以这种方式工作。
有三个重要要点需要理解
- 边缘本身具有属性——例如,在你的朋友列表中,你与该人的好友关系建立日期是您之间边缘的属性,而不是该人本身的属性。我们通过创建表示边缘的节点来处理这个问题。
- 列表本身具有属性,例如是否还有下一页可用。我们使用一个节点来表示列表本身,以及一个表示当前页面的节点来处理这个问题。
- 分页是通过游标完成的——指向下一页结果的不透明符号——而不是偏移量。
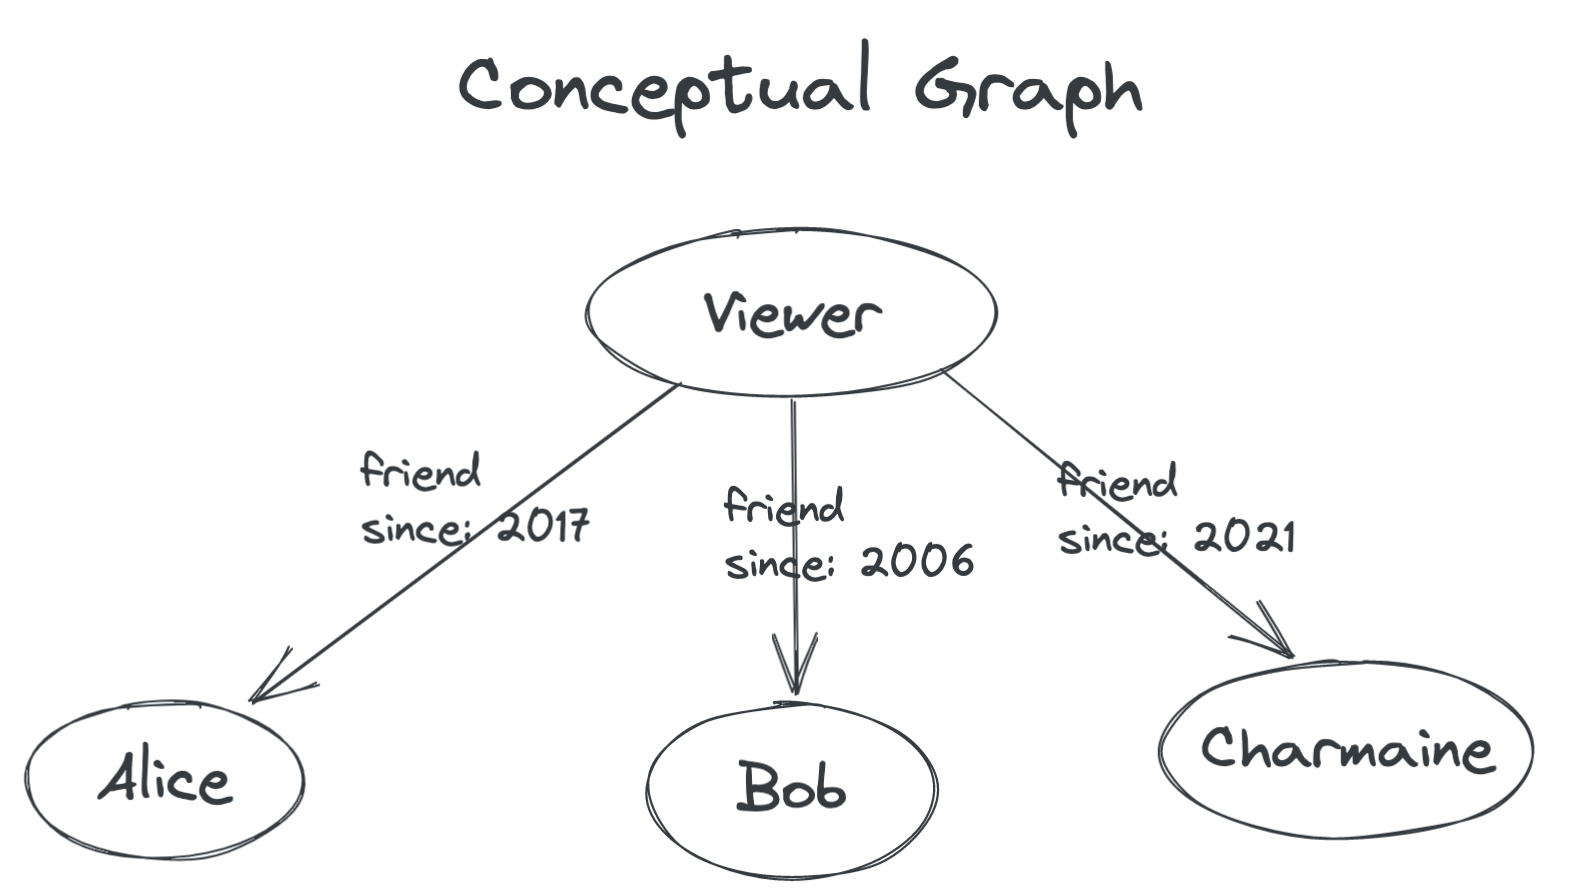
想象一下,我们想显示用户的友谊列表。从高层次上来说,我们想象一个图,其中查看者及其朋友都是节点。从查看者到每个朋友节点是一条边,而边本身具有属性。
现在让我们尝试使用 GraphQL 对这种情况进行建模。
在 GraphQL 中,只有节点可以具有属性,而不是边缘。因此,我们将首先使用它自己的节点来表示从您到您的朋友的概念边缘。
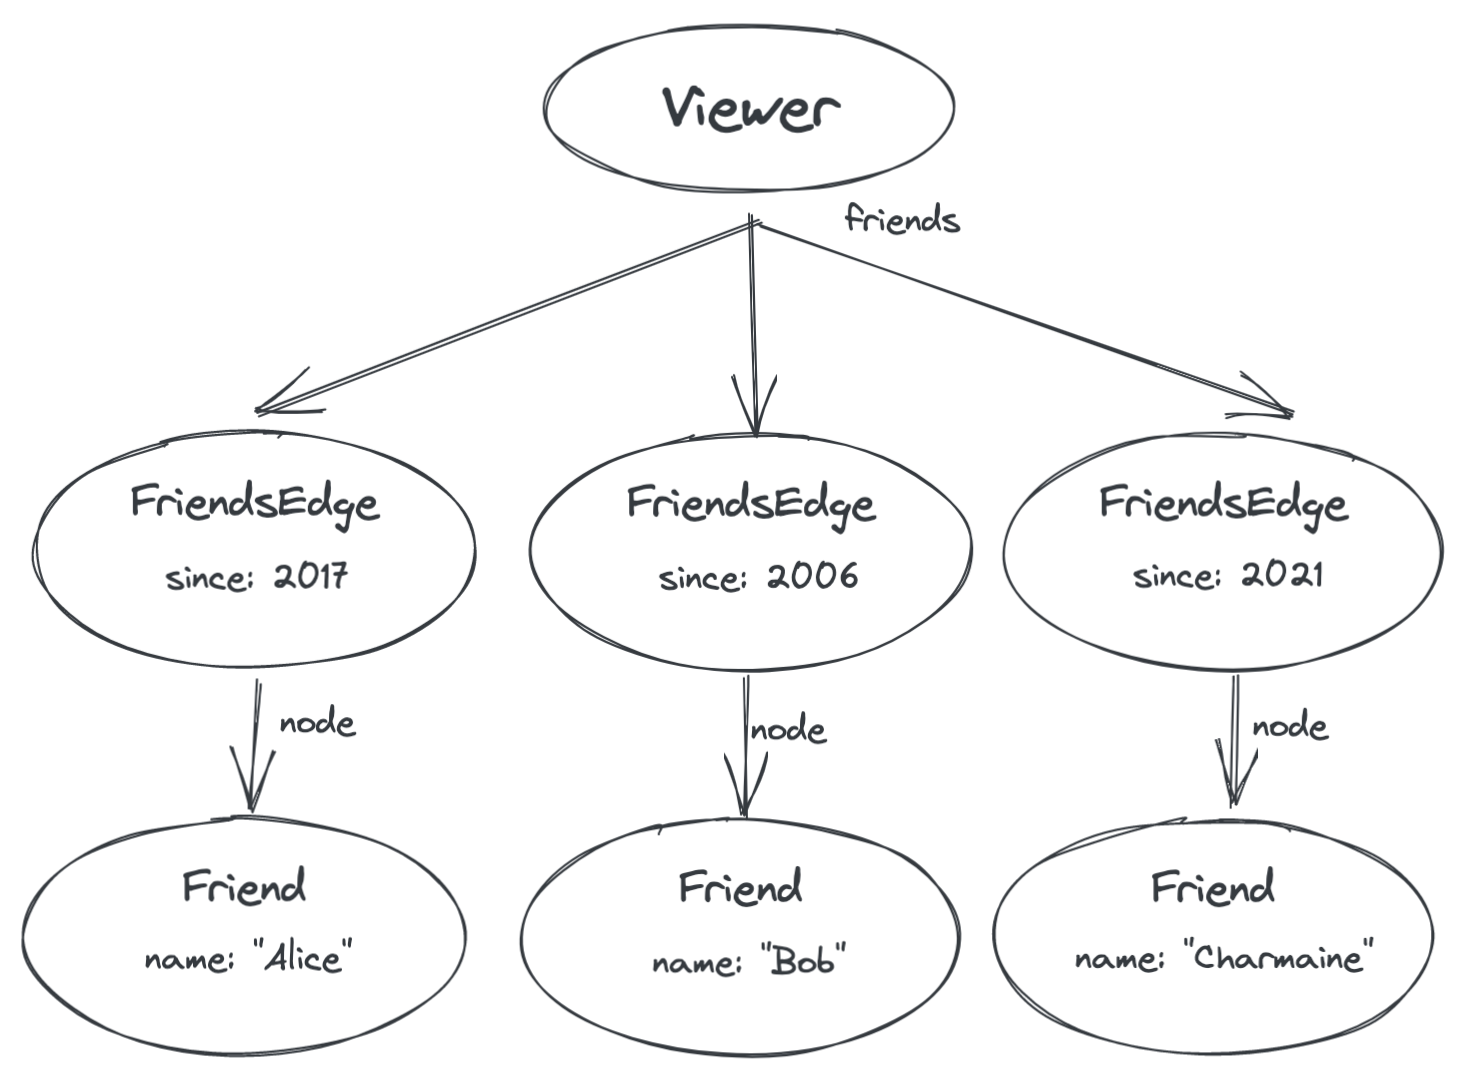
现在,边缘的属性由一个称为“FriendsEdge”的新节点类型表示。
查询此的 GraphQL 将如下所示
// XXX example only, not final code
fragment FriendsFragment1 on Viewer {
  friends {
    since // a property of the edge
    node {
      name // a property of the friend itself
    }
  }
}
现在,我们在 GraphQL schema 中有一个很好的位置来放置边缘特定的信息,例如创建边缘的日期(即,你与该人成为朋友的日期)。
现在,考虑一下为了支持分页和无限滚动,我们需要在我们的 schema 中建模什么。
- 客户端必须能够指定它想要的页面大小。
- 客户端必须被告知是否有更多页面可用,以便它能够启用或禁用“下一页”按钮(或者,对于无限滚动,它可以停止进行进一步请求)。
- 客户端必须能够请求它已经拥有的页面的下一页。
我们如何使用 GraphQL 的功能来完成这些事情?指定页面大小是通过字段参数完成的。换句话说,查询将不再是 friends,而是 friends(first: 3),将页面大小作为参数传递给 friends 字段。
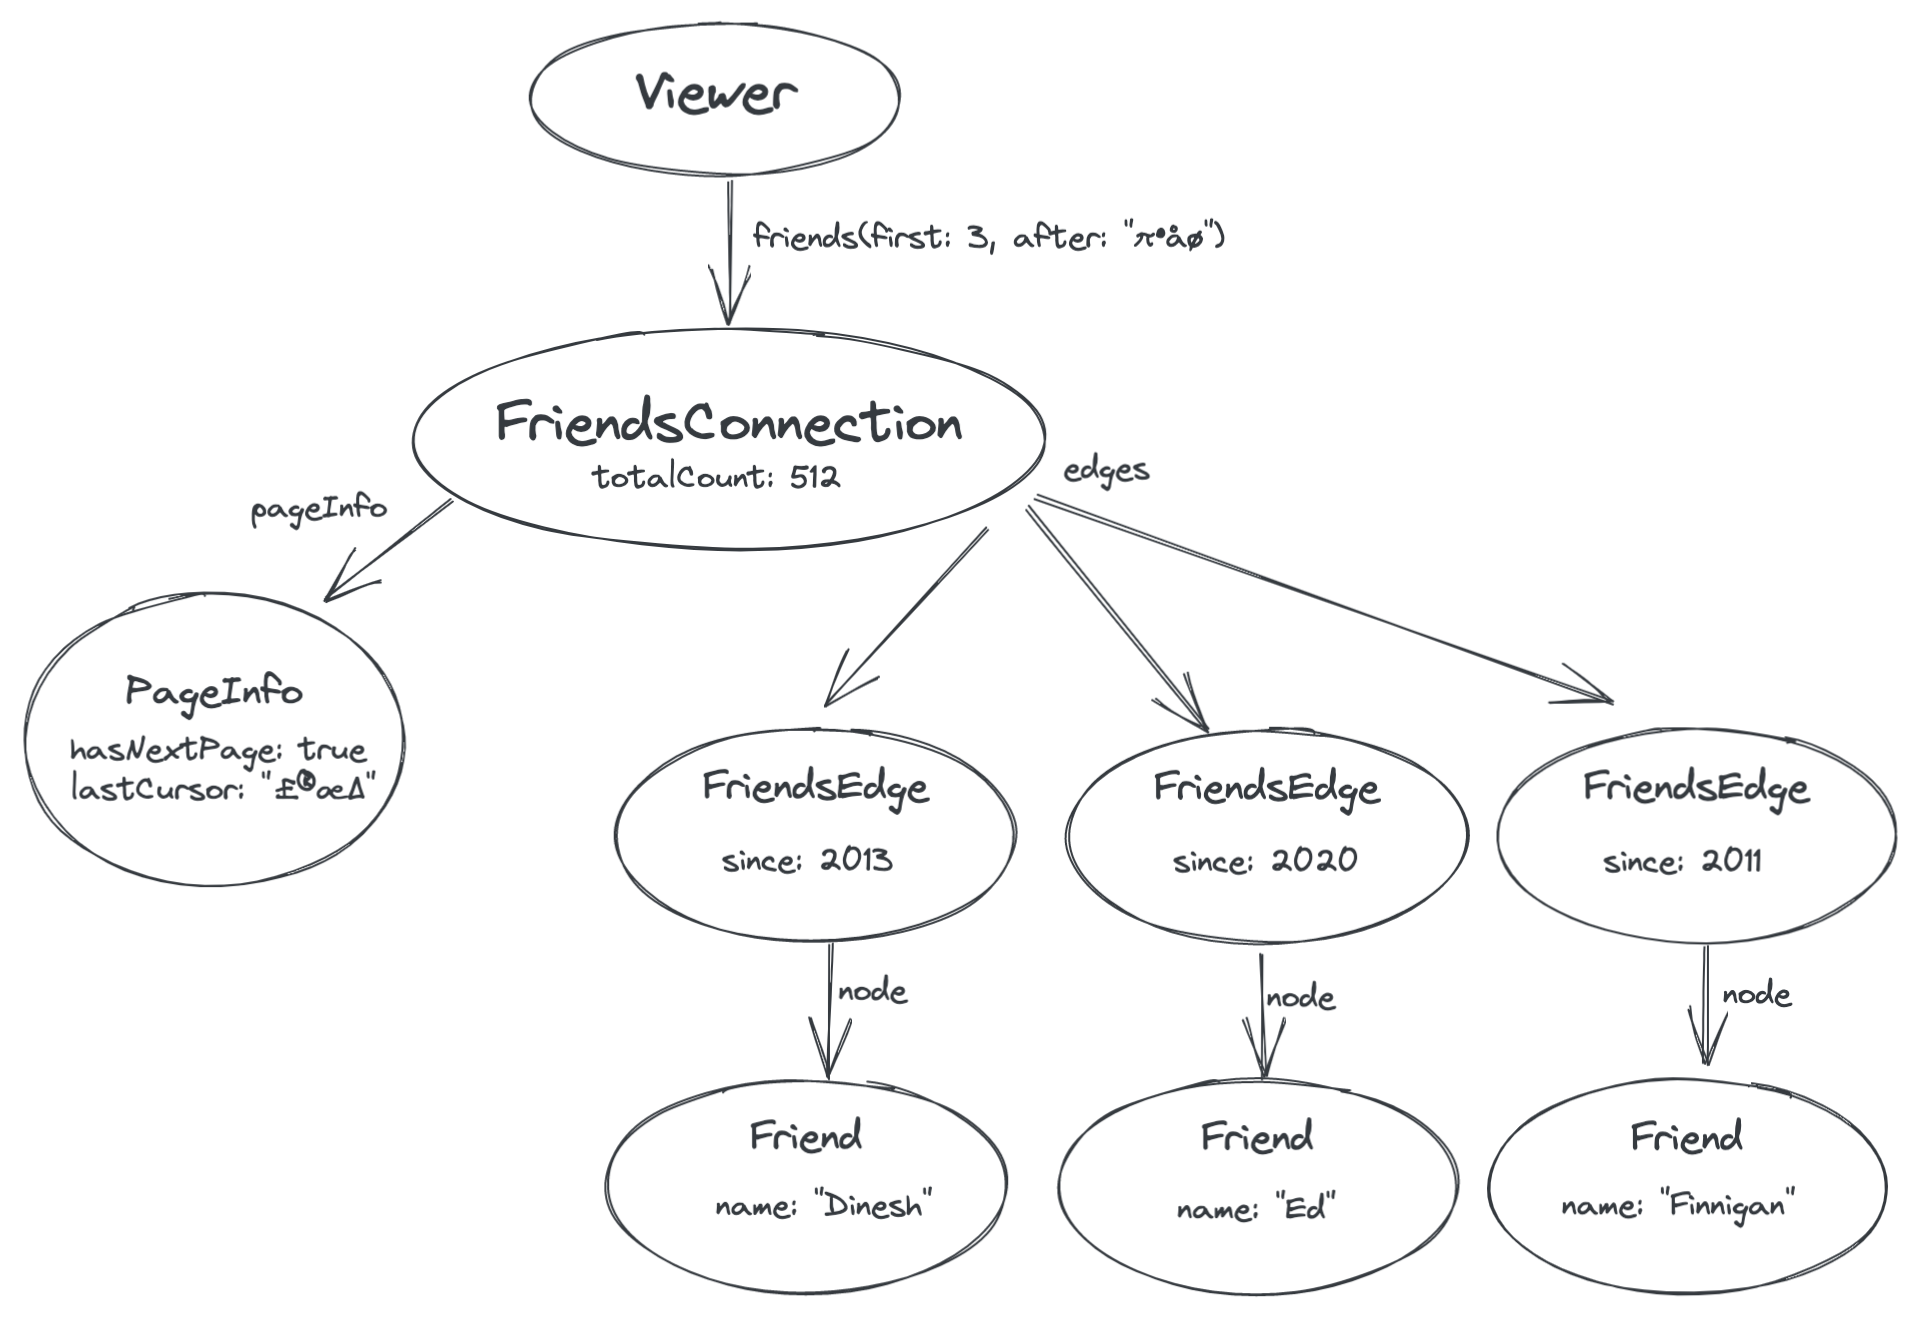
为了让服务器说明是否有下一页,我们需要在图中引入一个节点,该节点包含关于朋友列表本身的信息,就像我们为每个边缘引入一个节点来存储关于边缘本身的信息一样。这个新节点称为连接。
连接节点表示您和您的朋友之间的连接本身。关于连接的元数据存储在那里——例如,它可能有一个 totalCount 字段,表示您有多少个朋友。此外,它总是具有两个代表当前页面的字段:一个 pageInfo 字段,包含关于当前页面的元数据,例如是否还有其他页面可用——以及一个 edges 字段,指向我们之前看到的边缘

最后,我们需要一种方法来请求下一页结果。你会注意到,在上图中,PageInfo 节点有一个名为 lastCursor 的字段。这是一个由服务器提供的代表我们被赋予的最后一个边缘(朋友“Charmaine”)在列表中的位置的不透明令牌。然后,我们可以将此游标传递回服务器,以检索下一页。
通过将 lastCursor 值作为参数传递回服务器到 friends 字段,我们可以要求服务器提供在我们已经检索到的朋友之后的朋友
这种对分页列表进行建模的整体方案在GraphQL 游标连接规范中进行了详细说明。它适用于许多不同的应用程序,并且尽管 Relay 依赖于这种约定来自动处理分页,但无论你是否使用 Relay,以这种方式设计你的 schema 都是一个好主意。
现在,我们已经了解了连接的底层模型,让我们将注意力转向实际使用它来为我们的新闻提要故事实现评论。
实现“加载更多评论”
再次看一下 Story 组件。有一个 StoryCommentsSection 组件,你可以导入它并将其添加到 Story 的底部
import StoryCommentsSection from './StoryCommentsSection';

function Story({story}) {
  const data = useFragment(StoryFragment, story);
  return (
    <Card>
      <Heading>{data.title}</Heading>
      <PosterByline person={data.poster} />
      <Timestamp time={data.posted_at} />
      <Image image={data.image} />
      <StorySummary summary={data.summary} />
      <StoryCommentsSection story={data} />
    </Card>
  );
}
并将 StoryCommentsSection 的片段添加到 Story 的片段中
const StoryFragment = graphql`
  fragment StoryFragment on Story {
    // ... as before
    ...StoryCommentsSectionFragment
  }
`;
再次运行 npm run relay 以生成新的 Relay 工件并消除编辑器中的错误。
此时,你应该看到每个故事最多三个评论。一些故事有超过三个评论,这些评论将显示一个“加载更多”按钮,尽管它还没有连接

现在转到 StoryCommentsSection 并看一下
import LoadMoreCommentsButton from "./LoadMoreCommentsButton";

const StoryCommentsSectionFragment = graphql`
 fragment StoryCommentsSectionFragment on Story {
  comments(first: 3) {
    edges {
      node {
        ...CommentFragment
      }
    }
    pageInfo {
      hasNextPage
    }
  }
 }
`;

function StoryCommentsSection({story}) {
  const data = useFragment(StoryCommentsSectionFragment, story);
  const onLoadMore = () => {/* TODO */};
  return (
    <>
      {data.comments.edges.map(commentEdge =>
        <Comment comment={commentEdge.node} />
      )}
      {data.comments.pageInfo.hasNextPage && (
        <LoadMoreCommentsButton onClick={onLoadMore} />
      )}
    </>
  );
}
在这里,我们看到 StoryCommentsSection 使用连接 schema 约定为每个故事选择前三个评论:comments 字段接受页面大小作为参数,并且对于每个评论,都有一个 edge,并且在其中包含一个 node,其中包含实际的评论数据——我们在这里扩展了 CommentFragment 来检索使用 Comment 组件显示单个评论所需的数据。它还使用连接的 pageInfo 字段来决定是否显示“加载更多”按钮。
那么我们的任务是让“加载更多”按钮实际加载一页额外的评论。Relay 为我们处理了繁琐的细节,但我们确实需要提供一些步骤来设置它。
增强片段
在我们修改组件之前,片段本身需要三个额外的信息。首先,我们需要让片段接受页面大小和游标作为片段参数,而不是被硬编码
const StoryCommentsSectionFragment = graphql`
  fragment StoryCommentsSectionFragment on Story
    @argumentDefinitions(
      cursor: { type: "String" }
      count: { type: "Int", defaultValue: 3 }
    )
  {
    comments(after: $cursor, first: $count) {
      edges {
        node {
          ...CommentFragment
        }
      }
      pageInfo {
        hasNextPage
      }
    }
  }
`;
接下来,我们需要使片段可重取,这样 Relay 才能使用参数的新值再次获取它——即,$cursor 参数的新游标
const StoryCommentsSectionFragment = graphql`
  fragment StoryCommentsSectionFragment on Story
    @refetchable(queryName: "StoryCommentsSectionPaginationQuery")
    @argumentDefinitions(
    ... as before
`;
现在我们只需要对片段进行最后一次更改。Relay 需要知道片段中哪个字段表示我们将要分页的连接。为此,我们使用 @connection 指令将其标记
const StoryCommentsSectionFragment = graphql`
  fragment StoryCommentsSectionFragment on Story
    @refetchable(queryName: "StoryCommentsSectionPaginationQuery")
    @argumentDefinitions(
      cursor: { type: "String" }
      count: { type: "Int", defaultValue: 3 }
    )
  {
    comments(after: $cursor, first: $count)
      @connection(key: "StoryCommentsSectionFragment_comments")
    {
      edges {
        node {
          ...CommentFragment
        }
      }
      pageInfo {
        hasNextPage
      }
    }
  }
`;
@connection 指令需要一个 key 参数,该参数必须是一个唯一的字符串——在这里由片段名称和字段名称组成。这个键在突变期间编辑连接的内容时使用,我们将在下一章中看到。
usePaginationFragment 挂钩
现在我们已经增强了片段,我们可以修改我们的组件来实现加载更多按钮。
将 StoryCommentsSection 组件顶部的这两行代码
const data = useFragment(StoryCommentsSectionFragment, story);
const onLoadMore = () => {/* TODO */};
替换为
const {data, loadNext} = usePaginationFragment(StoryCommentsSectionFragment, story);
const onLoadMore = () => loadNext(3);
运行 npm run relay。现在,加载更多按钮应该会加载另外三个评论。
使用 useTransition 改善加载体验
就目前而言,当你点击“加载更多”按钮时,在新的评论加载完毕并显示之前,没有任何用户反馈。每个用户操作都应该产生即时的反馈,因此让我们在新的数据加载时显示一个微调器——但不要隐藏现有的 UI。
为此,我们需要将对 loadNext 的调用包装在 React 过渡中。以下是我们需要进行的更改
function StoryCommentsSection({story}) {
  const [isPending, startTransition] = useTransition();
  const {data, loadNext} = usePaginationFragment(StoryCommentsSectionFragment, story);
  const onLoadMore = () => startTransition(() => {
    loadNext(3);
  });
  return (
    <>
      {data.comments.edges.map(commentEdge =>
        <Comment comment={commentEdge.node} />
      )}
      {data.comments.pageInfo.hasNextPage && (
        <LoadMoreCommentsButton
          onClick={onLoadMore}
          disabled={isPending}
        />
      )}
      {isPending && <CommentsLoadingSpinner />}
    </>
  );
}
每个结果非即时的用户操作都应该包装在 React 过渡中。这允许 React 优先处理不同的更新:例如,如果当数据变得可用并且 React 正在渲染新的评论时,用户点击另一个选项卡以导航到另一个页面,React 可以中断渲染评论以渲染用户想要的新的页面。
无限滚动新闻提要故事
让我们使用我们所学到的关于分页的知识来创建一个无限滚动的新闻提要。新闻提要将与加载更多评论几乎相同,只是当用户滚动到页面底部时,loadNext 将自动触发,而不是通过按下按钮触发。
步骤 1——在查询中选择连接字段
目前,我们的应用使用topStories根字段来获取一个简单的包含三个头条新闻的数组。架构还提供了一个Viewer上的newsfeedStories字段,它是一个 Connection。让我们修改Newsfeed组件以使用这个新字段。再次看看Newsfeed.tsx - 顶部的 GraphQL 查询应该看起来像这样
const NewsfeedQuery = graphql`
  query NewsfeedQuery {
    topStories {
      id
      ...StoryFragment
    }
  }
`;
继续用这个替换它
const NewsfeedQuery = graphql`
  query NewsfeedQuery {
    viewer {
      newsfeedStories(first: 3) {
        edges {
          node {
            id
            ...StoryFragment
          }
        }
      }
    }
  }
`;
在这里,我们用viewer的newsfeedStories替换了topStories,添加了一个first参数,以便我们最初获取前三个故事。在其中,我们选择了edge,然后是node,它是一个Story节点,所以我们可以扩展之前相同的StoryFragment。我们还选择了id,以便我们可以将其用作 React 的key属性。
虽然为了简单起见,我们将topStory和topStories字段放在Query的顶层,但通常将与查看页面或应用程序的人员相关的字段放在名为viewer的字段下。现在我们正在使用该字段,因为它将在真实的应用程序中使用,我们将切换到该约定。
步骤 2 - 遍历 Connection 的边
我们需要修改 Newsfeed 组件以遍历边并渲染每个节点
function Newsfeed() {
  const data = useLazyLoadQuery(NewsfeedQuery, {});
  const storyEdges = data.viewer.newsfeedStories.edges;
  return (
    <>
      {storyEdges.map(storyEdge =>
        <Story key={storyEdge.node.id} story={storyEdge.node} />
      )}
    </>
  );
}
步骤 3 - 将 Newsfeed 降级为 Fragment
Relay 的分页功能仅适用于片段,而不是整个查询。这是因为,虽然我们在这个简单的示例应用程序中直接发出查询,但在实际应用程序中,查询通常是在一些高级路由组件中发出的,而该组件很少是显示分页列表的同一个组件。
要使它正常工作,我们只需要将NewsfeedQuery的内容分离到一个片段中,我们将其称为NewsfeedContentsFragment
const NewsfeedQuery = graphql`
  query NewsfeedQuery {
    ...NewsfeedContentsFragment
  }
`;

const NewsfeedContentsFragment = graphql`
  fragment NewsfeedContentsFragment on Query {
    viewer {
      newsfeedStories {
        edges {
          node {
            id
            ...StoryFragment
          }
        }
      }
    }
  }
`;
现在是时候提到每个 GraphQL 架构都包含一个名为Query的类型,它表示可用于查询的顶层字段。通过定义一个片段on Query,我们可以直接将其扩展到顶层。
在Newsfeed中,我们可以同时调用useLazyLoadQuery和useFragment,尽管在现实生活中,它们通常位于不同的组件中
export default function Newsfeed() {
  const queryData = useLazyLoadQuery<NewsfeedQueryType>(NewsfeedQuery, {});
  const data = useFragment(NewsfeedContentsFragment, queryData);
  const storyEdges = data.newsfeedStories.edges;
  ...
}
步骤 4 - 增强 Fragment 以进行分页
现在我们正在使用 Connection 字段来表示故事,并且已经有了自己的片段,我们可以对片段进行必要的更改以支持分页。这些与上一个示例中的相同。我们需要
- 为页面大小和游标添加片段参数 (
first和after)。 - 将这些参数作为字段参数传递给
newsfeedStories字段。 - 将片段标记为
@refetchable。 - 用
@connection标记newsfeedStories字段。
你应该得到类似的东西
const NewsfeedContentsFragment = graphql`
  fragment NewsfeedContentsFragment on Query
    @argumentDefinitions (
      cursor: { type: "String" }
      count: { type: "Int", defaultValue: 3 }
    )
    @refetchable(queryName: "NewsfeedContentsRefetchQuery")
  {
    viewer {
      newsfeedStories(after: $cursor, first: $count)
        @connection(key: "NewsfeedContentsFragment_newsfeedStories")
      {
        edges {
          node {
            id
            ...StoryFragment
          }
        }
      }
    }
  }
`;
步骤 5 - 调用 usePaginationFragment
现在我们需要修改Newsfeed组件以调用usePaginationFragment:
function Newsfeed() {
  const queryData = useLazyLoadQuery<NewsfeedQueryType>(
    NewsfeedQuery,
    {},
  );
  const {data, loadNext} = usePaginationFragment(NewsfeedContentsFragment, queryData);
  const storyEdges = data.viewer.newsfeedStories.edges;
  return (
    <div className="newsfeed">
      {storyEdges.map(storyEdge =>
        <Story key={storyEdge.node.id} story={storyEdge.node} />
      )}
    </div>
  );
}
步骤 6 - 使用滚动触发器进行分页
我们准备了一个名为InfiniteScrollTrigger的组件,它可以检测何时到达页面底部 - 我们可以使用它在适当的时候调用loadNext。它需要知道是否还有更多页面以及我们当前是否正在加载下一页 - 我们可以从usePaginationFragment的返回值中获取这些信息
import InfiniteScrollTrigger from "./InfiniteScrollTrigger";

function Newsfeed() {
  const queryData = useLazyLoadQuery<NewsfeedQueryType>(
    NewsfeedQuery,
    {},
  );
  const {
    data,
    loadNext,
    hasNext,
    isLoadingNext,
  } = usePaginationFragment(NewsfeedContentsFragment, queryData);
  function onEndReached() {
    loadNext(1);
  }
  const storyEdges = data.viewer.newsfeedStories.edges;
  return (
    <div className="newsfeed">
      {storyEdges.map(storyEdge =>
        <Story key={storyEdge.node.id} story={storyEdge.node} />
      )}
      <InfiniteScrollTrigger
        onEndReached={onEndReached}
        hasNext={hasNext}
        isLoadingNext={isLoadingNext}
      />
    </div>
  );
}
现在我们应该能够滚动到页面底部并看到更多故事加载。感觉就像一个真正的新闻提要应用程序!
总结
- Connection 是 Relay 依赖的架构约定,用于对可分页列表的行为进行建模。
- 通常,在你的架构中使用 Connection 比使用简单的列表更好。这使你能够在需要时进行分页。
接下来,我们将最终了解如何在服务器上更新数据。Connection 也将在其中发挥作用,因为我们将看到如何将新创建的节点追加到现有的 Connection。